Ceramic Bead Artists Tutorial by Marsha Hedrick -- Pate' sur Pate' or slip trailing
Slip Casting Beads
Recycled Brighton Tin Cuff Bracelet and
Making Ceramic Beads
Painting Mimbres
Making a Lentil Bead
New Bracelet
Painting Lips, Cheeks and Eyes on Kids
Clay Play for Everyone
Making Ceramic Beads from 2-Part Molds
Making a Hollow Clay Focal Bead
Making Clay Tassel Beads
Glazing a daisy lentil bead
Houseold Items...Cool Looking Beads
Rolling Ceramic Beads
ABOUT FACE Necklace
Patching the pour hole in a poured bead
Pouring A Plaster Mold
Antique Lace Impressions in Clay
Making of a Bead Box
Making a Bead Measurer
Assembling a Hand formed Pendant
Pate' sur Pate' or slip trailing
Mold Making for Slip Casting
Stamping Ceramic Beads
Making Ceramic Beads
Pate' sur Pate' or slip trailing
By Marsha Hedrick
Share this Item with your Social Network friends.
(you need to be logged in to the social media) Tweet
(you need to be logged in to the social media) Tweet
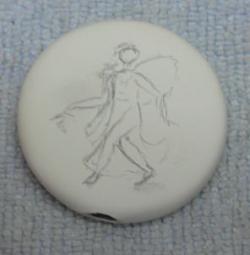
I do my slip trailing on dry porcelain but most people do it on wet pieces. I prefer doing it dry as it allows me to do more detailed carving and modeling of the slip trailed design resulting in a more detailed piece. Time is also not a consideration because it is already dry so no need to worry about it drying out.
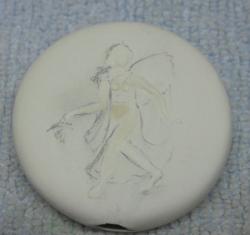
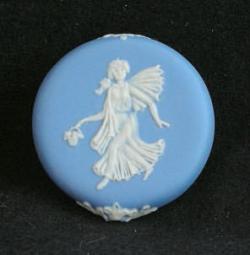
In this photo you can see how the color of the white porcelain and the color of the blue porcelain of the bead are nearly the same. This increases the difficulty of this method of decoration because it is very difficult to see what you are doing. Bright light is essential. Also because the white porcelain is translucent when it is fired some of the blue will show through in the thin areas and it is very difficult to tell how much porcelain is needed to achieve a totally white area and how little is required to give the illusion of transparency and shadows.
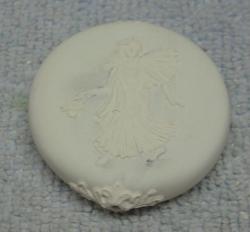
This photo shows the bead ready for firing after several hours of decorating time.